Monday, December 16, 2013

My first experience with the WiiU

December 7th was when I got me a WiiU plus a handful of games. However, it wasn't until last night when I hooked up the system. 

Having the Wii I knew it wasn't going to be a breeze to hook it up but at the same time it wasn't rocket science etiher.

One of the first things I dind't like is the glossy finish on the main unit, it is big finger print collector. I had to clean it when I decied where to put it (on top of the X360).

I like the fact, every single basic cable is included (namely the HDMI cable). I already had Wii remotes laying around, although I ultimately decided to get a candy orange control which will be dedicated to the WiiU.

After I hooked up everything, I had to remove the Wii U gamepad form the craddle and hook it up directly to the AC adapter since it was completely dry. The first thing I had to do was to sync up the Wii U tablet, after syncing the controller I set up the WiFi connection, the TV remote (very easy to pair with my Samsung TV and my Dish receiver) and then the dreaded update. It took like an hour or so, I don't since I abandoned the console and went to the living room to watch the soccer final (León Campeón yay!!!).

After the update finished, my controller was also fully charged. I hooked up the craddle the way it is supossed to be. I spent some time creating a Mii and a Nintendo Network account, and then finally I went on to play some Super Mario 3D World. I played a couple levels (I love what I'm seeing).

Also, I popped in Ducktales remastered. Some people may feel anoyed by the cutscenes, in my opinion, I like them. I like how they created a backstory and how the story develops during the game, it feels almost like watching a Ducktales episode. I just played the Transyvania level.

Al the time I played using the tablet and it felt comfortable, perhaps a bit bulky at times but comfortable overall. Next session I'll give the wii remote + classic controller pro a try. 

That's all I have for now. Until next time...


Friday, October 25, 2013

Telcel APN configuration

Name: Internet
APN: internet.itelcel.com
Proxy: NO
Port; NO
Username: webgprs
Password: webgprs2002
Server: NO
MMSC: NO
MMS Proxy: No
MMS Port: NO
MCC: 334
MNC: 020
Authentication Type: PAP
APN Type: default,supl

Tuesday, October 22, 2013

13' Nissan Versa Head Unit replacement

This is how I replaced the stock head unit on my 13' Versa. The stock audio system is a good system, but after almost a year I wanted something with more features (most notably a touch screen). Previous to this, I had the speakers replaced with four Polk Audio Dxi 650.

After doing some research and asking a few vendors, this is what I came up with:

- Metra 99-7613 Dash Kit (not required, the original brackets fit just fine)
- PAC TR7 Video Bypass (also not required, JVC radios are easily bypassed)
- Metra 40-NI12 Antena adapter
- Metra 70-7552 wiring harness
- Sirius SXV200 module
- Fake faceplate


The first step was to prepare the harness. Using the couplers included with the TK12 I color matched all cables with the JVC harness. Also, I performed the power connections for the ASWC-1 harness. The ASWC-1's Gray/Red and Gray/Blue wires were left pending as the 70-7552 doesn't have the pins for the steering wheel controls.

This is the resulting harness:


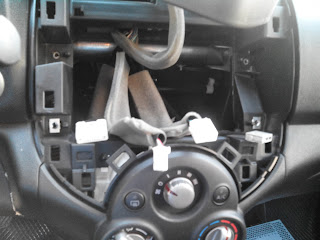
Next was remove the panel. For that purpose I used the panel removal tool. It was matter of inserting it in the let top corner. As I removed the panel I was careful with the hazard flashers switch.


With the radio now accesible it was a matter of just removing the four screws and unplugging the cables.


At this stage, from the car harness, I spliced cables at pins 6, 16 and 15 and perfomed the connections to gray/red, gray/blue and ground on the ASWC-1.

As stated before, the Metra 99-7613 is not required if the original brackets are available. With the excpetion of one screw on each side, the brackets fit nicely.


With all harnesses ready, I hooked up everything to test the radio and program the ASWC-1


With the 13' Versa press the igintion switch twice without pressing the brake pedal. After the ASWC-1 start blinking rapidly, press and hold the Steering Wheel Volume Up button until the unit stops flashing, after that release the button and wait for the LED to stay solid red. At that point test the volume control.

The XM unit is located in a compartment behind the glove box (plenty of room there) and I routed the cable and mounted the antenna inside the windshield on the passenger side. The reception is really good, so I didn't have to mount the antenna outside.

I ran the microphone cable above the flashers switch. A matter of remving a small cover.

This is how it looks after I put everything in place:


For the video bypass, I only had to ground the green e-brake cable.

As a protective meassure I ordered this fake faceplate:


However, being a common item, it could be counterproductive to use it, so I ordered a 07 Versa OEM faceplate. I didn't have to alter it in any way. It fits perfectly in place of the JVC faceplate.


Now it looks like it still has the stock radio.

Here's a video showing DVD player and steering wheel control in action:


For my next projects I intend to install a backup camera and mount a Dreamcast.

Until the next time...


Tuesday, July 9, 2013

"Pimped out" NES Everdrive N8


From Krikzz (famous for his Everdrive line of flashcarts) and DuoR (well known PCEngineFX modder) we have the NES Everdrive N8 "Pimped Out" edition.

Whats is the Everdrive N8?

Well, it is a Printed Circuit Board (PCB) which allows you to load (from an SD card) any NES and Famicom Disk System rom you want on real hardware. In other words, games you typically play on an emulator can be played on the real console.

What is the advantage?

Since we are executing the game code directly on original hardware, the experience is exactly the same as if we were playing with the original cartridge.

Dude, I still don't get it, can you give an example?

Let's say you wanna play The Flintstones: Surprise at Dinosaur Peak on a real NES console. You would have to shell out some serious cash for the original game or ask someone to make a reproduction (good luck with that one). With this cartridge, you can play the game just like if you were using the real cartridge.

Another example would be if you want to play a homebrew or a hacked game, like for example DPad Hero, Mario Adventure, the translated Final Fantasy II or maybe the 32 teams updated roster version of Tecmo Super Bowl.

What about compatiblity, will all games work?

The compatiblity is great, the most popular titles such as Mario, Megaman Ninja Gaiden, TMNT, etc work just the same as playing them from the real carts.

What really surprised me was the fact you can play FDS games. The original Zelda, the original Mario II (Lost Levels), All Night Nippon Super Mario, Doki Doki Panic, etc are fully playable on the NES. Even if a game asks to switch to side B, that's no problem, the Everdrive will switch it for you. Pressing the reset button will save your data to the SD, simulating saving to the floppy disk.

Unfortunately not all roms work, some of them (most notably the multicart cagmes) will throw an A5 error (rom is bigger than 512 kb), other will throw a non supported mapper error. Krikzz is continuosly working and compatiblity may be increased on a future firmware update.

One of the most notable non working games is Castlevania 3, luckily, its japanese counterpart Akumajo Densetsu works, although it sounds a bit odd. This is because of the extra sound hardware present on the Famicom but absent on the NES.

Can I save my progress in Gold Medal Challenge, NES Open Golf, etc?

Yessss!!! For those games which featured a battery (Kirby, Turbo Racing, etc) the Everdrive saves our progress in a .sav file inside the SD card. So no more frustatration because you lost your progress in Zelda. Also, these .sav files are compatibles with emulators, so you may continue / resume to / from other devices as you wish.

What is this "pimping" all about?

Normally, if you order a flash cart directly form Krikzz, you would typically get the bare PCB or for an addtional $15 you would get a (not so inspired) shell and that's it. The price would be something like $124 + shipping. However, if you order 10+ unit you get a discount.

So, what our friend DuoR did was order 10 PCBs directly form Krikzz.

Once he got them, using original shells, he:

- Cut a hole to insert / remove the SD card.
- Painted them in the buyer's requested color (the options if I remember correctly were, no paint, charcoal, blue and black)
- Designed and applied a cartridge label
- Conditioned a "universal" box
- Designed and printed a box insert and manual.

The result can be apreciated in the video. The final price was $115.49 including shipping and it looks way cooler.

I'm pending to edit the video and show the Everdrive itself in action.

Until the next time.

(2) They;re called universal because they can be used with any videogame cartridge. The truth is DuoR had to cut a few pieces of plastic and decorate with a cool Everdrive label so the NES cart would properly fit.

Friday, May 10, 2013

Sega-16 challenge

I recently joined the Sega-16 challenge. More info here

Going through all the sports games is going to be the hardest part of the challenge, so I'm contributing by playing one of my all time favorites: Tecmo Super Bowl II.

I had so much fun that I didn't document the first season but I'll definitively do it during the second and third seasons. 


Tuesday, April 2, 2013

Sega Master System Model 1


...and I got the system the following week.

Nice looking machine, I love it. Too bad the library of games was not as impresive as its competitor.

Curious thing, Ghost House was remade into a Brazilian SMS game, Chapolim x Dracula starring El Chapulín Colorado.

See you later...