Sunday, October 17, 2010

HTPC Project

The HTPC project was a success (not without its share of obstacles), the important thing is now I don't have to bother hooking up my laptop to my TV and my Home theater. Besides watching series, movies and listening to music, the intention is to also play some games, mainly emulators.

This is the components list:


- Hitachi 160 GB Sata HD (I got it from my Magnavox 2160A DVDR)
- 2 GB DDR3 PC8500 (don't remember the brand)
- WD Caviar Green 1TB HD (I had it laying around). This is were all the media is stored.


- 2.4 Ghz Tiny Wireless Keyboard and Touchpad (Amazon link)


- MI-008 ITX Chassis (Amazon link)


- ASRock A330ION Motherboard. (link to the Amazon site)


The assembly process was pretty much the same as with other computers I've assembled in the past, the only difference was that due to the limited space of the chassis, I had to remove the PSU, so I had more room to install the mainboard and hookup the components and jumpers. The mainboard accompanying documentation is good enough to identify what goes where so no biggies there.

The only thing I wish the chassis had was an extra bay for a second hard drive; there is some room at the bottom but I had to improvise with some velcro to keep the HDD in position.

Another option would have been attaching the second hard disk on the optical disk bay, but since I plan to later install a DVD drive (yeah, I don't care for BluRay) this was not an option for me.


Once the hardware components were integrated (see picture above), the next obstacle was to install Windows XP. I had to find a suitable way to begin the installation from a USB stick, fortunately for me I found WintoFlash, which converts any modern Windows installation disk into a bootable usb installation. Make sure you boot into the usb stick everytime and follow the directions. The first boot is done in "text mode" and the next two are done in "GUI mode".

OK, so once the XP text mode install began, it only detected the usb stick and it didn't detect any of the Sata hard drives. The reason is XP wasn't really created with Sata disks in mind back in the day.

What I had to do was to download nLite, an app which allows you to customize a modern Windows install. Amongst other things it allows you to integrate third party drivers. I wont won't go into much detail, I'll just say I integrated the XP Sata drivers from the mainboard driver disk.

Once the XP install install detected the sata disks and my 160 gb was detected as C: (very important, otherwise you will be asking for trouble later), I began the installation process as usual. Once the computer restarted (form the stick) I selected option 2 (gui mode), answered the wizard questions as usual (keyboard type, region, admin password, etc) and let the installation continue. The installation may take a while because XP only loads USB 1.1 drivers.


Windows XP, copying the necessary files (grab a coffee, watch some TV, it'll take a while).

After the installation finishes and Windows boots for the first time, it is safe to boot from the Hard Drive afterwards. The next step was to connect to the internet and download the most updated drivers from the ASRock website (I also integrated the Ethernet drivers on the XP installation).

From that point I installed a basic antivirus (Avg free), then proceeded to install video codecs (Klite codec pack), XBMC, Boxee, etc. Once I get the DVD drive, I can use the Xbox 360 and the Wii only for playing, well, 360 and Wii games and nothing else.


The "Big Four" concert, in glorious HD and 5.1 sound.


A live internet stream.

As I keep testing (like overclocking the CPUs) I'll update.

Over and out.


Thursday, September 2, 2010

Replacing the Windows 7 startup sound


Back in the old days of Windows 95 I used to have my own sound ("Greetings") when I started windows. The capability to customize the startup sound is not there in windows 7.

First, you need to find the file that controls the windows startup sound. It is called "imageres.dll" and it is found in the windows directory. In my computer it was:


C:\Windows\System32\imageres.dll

Next, you need to change the ownership of this file. This file cannot be overwritten or modified without ownership, so I used these instructions:

http://www.blogsdna.com/2159/how-to-take-ownership-grant-permissions-to-access-files-folder-in-windows-7.htm

Next, you need a file that allows you to edit the dll file. I downloaded that from

http://delphi.icm.edu.pl/ftp/tools/ResHack.zip

After I unzipped ResHack, I ran it as an Administrator. I then opened the imageres.dll file, made a copy of the original in to safe place, and then opened the file again in the system32 folder.

I expanded WAVE and 5080 as shown, and there is a resource called 1033.


If you click on Play WAVE you will hear the windows startup sound.

The next step is to right click on the resource 1033, and select "Replace Resource"

You will see this menu:

Click on "Open File With New Resource" and navigate to a .wav file of your choice.
(In this example I am using a file called "alerted.wav")
Click on "Open", then put "WAVE" in as the resource type, "5080" (or whatever number that folder is labeled) is as Resource Name., and "1033" or whatever number is indicated as Resource Language.


Click "Replace". Then save in the original location and quit ResHack.

Right click on your desktop, select Personalize from the menu, click on Sounds, and check the Play Windows Startup sound and click "Apply".

When you restart, it should work, if not, ask someone who knows what they are doing for help.

Comments: Some people commented that they could not get this to work. You need to run ResHack as an administrator, or else you won't get it to work. Also, I received some comments obviously written by a child. If you are a child playing with your parents computer, don't do this!

If you have trouble saving the changes, it is because you didn't take ownership of the .dll. The child that posted a comment that this couldn't be done obviously omitted this step. More detailed instructions are below.

How to Take Ownership in Windows 7

1. Locate the file or folder on which you want to take ownership in windows explorer
2. Right click on file or folder and select “Properties” from Context Menu
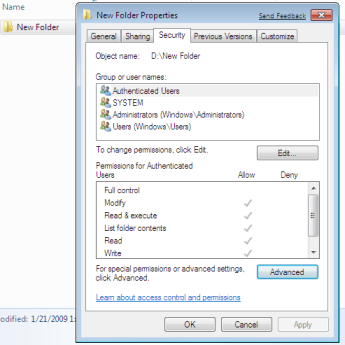
3. Click on Security tab
Windows 7 Files and Folder Security Tab
4. Click on “Advanced”
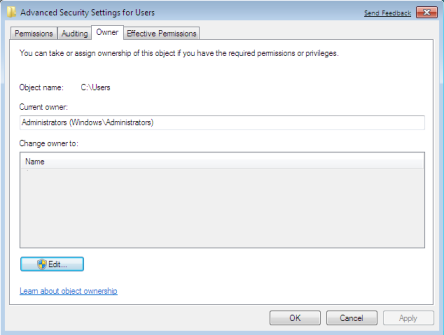
5. Now click on Owner tab in Advance Security Settings for User windows
Owner Tab of Advance Security Settings
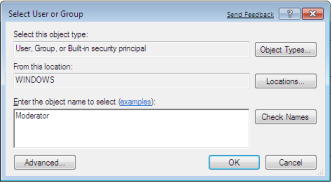
6. Click on Edit Button and select user from given Change Owner to list if user or group is not in given list then click on other users or groups. Enter name of user/group and click ok.
Other Users or Groups
8. Now select User/group and click apply and ok. (Check “Replace owner on subcontainers and objects” if you have files and folder within selected folder)
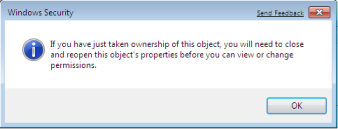
9. Click ok when Windows Security Prompt is displayed
Window Security Prompt
10. Now Owner name must have changed.
11. Now click Ok to exist from Properties windows
Once you have taken the ownership of file or folder next part comes is Granting Permissions to that file/folder or object.

How to Grant Permissions in Windows 7

1. Locate the file or folder on which you want to take ownership in windows explorer
2. Right click on file or folder and select “Properties” from Context Menu
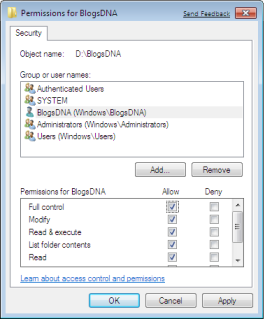
3. Click on Edit button in Properties windows Click ok to confirm UAC elevation request.
4. Select user/group from permission windows or click add to add other user or group.
5. Now under Permission section check the rights which you want to grant i.e check“Full Control” under the “Allow” column to assign full access rights control permissions to Administrators group.
Change Permissions
6. Click Ok for changes to take effect and click ok final ok to exit from Properties window.


Monday, July 5, 2010

Blog purpose

I'm not getting rich by writing on this blog. That's the way it should be, write just for fun.


Thursday, June 24, 2010

Another "classic" video

And the struggle continues...


Thursday, June 10, 2010

My review of MLB.tv


This a must for the ultimate baseball fan anywhere in the world. That's right, unlike other services based in the US only available to US residents, a MLB.tv subscription may be purchased from anywhere. That's something I like about MLB, you are allowed to be a fan anywhere in the world, not only because of the MLB.tv package availability but for example for buying tickets. You could for example buy a ticket and choose "print at home" and have your ticket in hand even before traveling to the US (exception are those teams still associated with Ticketmaster).

Ok, I'm deviating from the subject of this article. Back to MLB.tv This is one of those out of market packs in a similar fashion as the NFL Sunday Ticket. According to the MLB website all you need is a broadband connection (pretty common nowdays) of at least 768k, 3M if you want to watch in High Def. In my experience 1.7M (meassured using speedtest.net) will give you a steady broadcast.

If your computer is not recent, you'll have to settle for a lower quality setting since the application is processor and graphics card intensive. In any case, the game is displayed in 16:9 aspect ratio which is still pretty good for a HDTV.

Most of the time, the video quality is excellent. I say "most of the time" because like many things in life is not perfect. I noticed for some games (usually when the Yankees play) even using the lowest quality setting and even if you have plenty of available bandwidth, the video may freeze at times, using the lowest quality setting helps alleviate the problem and with some patience it'll go away.

Where it really fails is in the auditory department, most of the time you find yourself cranking up the volume on both your computer and your stereo. Also the audio quality sometimes reminds me of the early days of the Real Player.

When I began using the service in early May, commercial were practically non existent, which made it kinda weird only to see the MLB logo with the "commercial break in progress" legend. Lately for some games, somoe external spondors have begun to appear like some recreational park chain and Toyota. So the commercial breaks are less silent.

Overall is a pretty good service, you get to see any team outside your market and I think the price is very competitive ($99 USD for the basic version).

Blackouts are non existent outside the US and Canada regardless of what is being broadcasted in local TV systems. In the US and Canada there are blackouts, however I haven't encountered a problem because of 1) the main purpose is to watch something outside my market (currently for me, any game involving the Cubs and the Whitesox) 2)if want to watch something in my market, those games are broadcasted on local TV and regional sport networks.

For information and to subscribe visit www.mlb.com

See you soon.


Monday, March 29, 2010

Reproduction Cartridges


The wait is finally over. After about six weeks, the games I ordered from gamereproductions.com arrived. They are awesome !!! They look and feel like any regular NES game cartridge. They were well worth the wait.


The games I ordered are the original Super Mario Bros. 2 for the Famicom Disk System (I won't go into details) and Megaman Ultra which is an excellent hack of Megaman 2, (feels a lot more like a fresh new game).


Great job Phil, your dedication is well noticed in these reproductions. Keep up the good work man.


Thursday, March 25, 2010

Imation Earthwise


Imation, (yes, the company behind optical media) now is in the generic toner cartridge business. They are currently selling generic carts for HP (pretty much all models), Canon and Brother. I must confess I'm a bit skeptic with re manufactured cartridges (specially with ink ones). However, with a company like Imation, I'm curious to see if these can match the quality of their other product lines.


For now, I ordered a trial cartridge for a HP 4345 mfp, if everything goes well my company may be able to save about $160 per cartrdige.


I'll let you know how things went.


Source: http://www.imation.com/products/earthwise


Wednesday, January 27, 2010

The Genesis legacy keeps going


While it's very convenient to just play Genesis games on a PSP, the nostalgic value of popping in a real cartridge has no rival. Since Nomads are becoming more difficult and pricey to come by, this GenMobile system looks like a good choice even you don't have any cartridges on hand, as the system has 20 built-in games. It includes such classics as Sonic and Knuckles, Altered Beast or Ecco the Dolphin. The package makes look like a pretty collectible system. If you are a Genesis fan or just have some curiosity, this is something you may wanna try.


Saturday, January 23, 2010

The hedgehog with the attitude

Here is a video of Shadow having a little fun. Enjoy.